How to make a gallery image page on Blogger

I jumped into blogging quite blindly.
I didn't prepare or read anything about blogging. I know...I know, what was I thinking?
I didn't know how much technical things you need to know to run a blog efficiently.
I didn't realize the hours that go on behind the scenes to making your blog look nice and easy for your readers to get around.
One baby step at a time, I learned how to make it look like how I had envisioned in my mind.
I focused on sharing my heart and staying true to my vision.
I messed up a lot and still do. There is still so many things that I would like to tweak and change about my blog. But I want to keep my priorities in order, so I do what I can when I can. In other words, instead of it taking me months to get my blog how I want it, it has taken me years. Don't worry it doesn't have to be the same for you. I just have different priorities.
Everything on my blog I have figured out how to do myself or through tutorials. It has been a lot of trial and error, but I am pretty proud of what I have been able to accomplish for not being a computer nerd.
I would much rather spend my time on writing encouraging posts, sharing diy's and recipes and posting lots of pretty pictures, but there is just so much more to blogging then doing the fun stuff.
I know that making my blog aesthetically pleasing will pay in the long run, and all the things that seemed hard at first will be a piece of cake once I master them.
One thing that I have wanted to do for a long time is to make my posts easily accessible. The way I wanted to do that was to have a gallery on each of my pages. That way you could go to the page of your choice see the pictures of the post, click on them and be transferred to that post.
Not only is this a great way to showcase older posts but it's like a library for your blog. Having it all in pictures makes it more alluring to click on the picture and find the topic you want to read about. I am very visual so I if I see a pretty picture I know I will be more drawn to click on it.
I searched high and low for a tutorial or template to be able to do this easily. Unfortunately I didn't find much that was helpful. I am sure there is some plug in somewhere to make this easier but I could not find one for blogger. I know that many serious bloggers have moved on to wordpress, which seems to have many more plugins and benefits, but I am just not there yet. I might one day when I get up enough gumption;)
The only tutorial I found that helped me a great deal was this tutorial from Laura's Crafty Life. It will give you the html code that you can easily add to your page. But I still was missing a lot of pieces to the puzzle to make all the photos the same size and how to add them. Remember, to someone who knows nothing about html or coding this was all foreign to me. I needed step by step directions on how to do everything.
If you have been looking to make your pages into a beautiful gallery and know nothing of how to make this happen, this post is for you.
1. Upload your photos to photobucket
To upload your pictures onto your page you first need to upload them to a source that you can get a link image for them. Photobucket is a free resource where you can store, edit and transfer your photos easily. All you have to do is register for your free account.
2.Crop your pictures into a square.
Once you upload your photos to photobucket you then need to crop them. Simply click on your photo and a edit image will pop up then go to the crop button. Different sizes will come up. You want to click on the square button. Your picture will turn into a square shape. You might need to center it a little bit. When you are done save your photo.

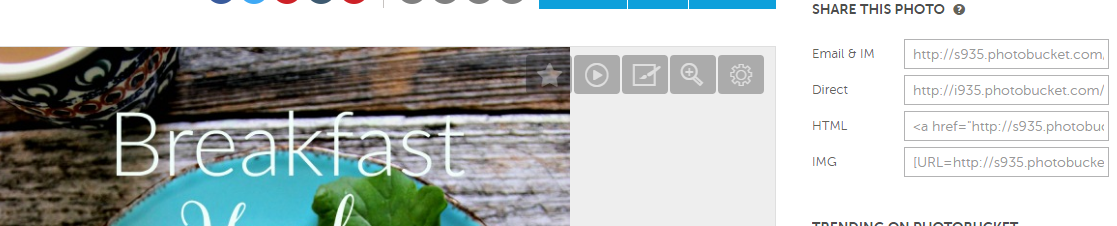
3. Copy the image link
Now go to your library/bucket and click on the picture you want and then to the right of the picture you will see some links with the title "Share this Photo" above them. You want to click on the direct link. It will immediately copy your photo link. Make sure you only do this when you are ready to paste it into your page.
4. Add html code to your page
Remember that tutorial from Laura's crafty life I mentioned? Now is when you want to go their and copy it. If you want your pictures 4 across copy the whole thing. If you want them 3 across copy it up to the third line where is says"Name you want to be displayed" and then it will have this right after it </a></td>
Go to your page on blogger. Open it up in html and add in the code.

5. Add in the Url of your post and image
In the coding where it says- http://yourprojectposturl.com
Add in the url of the post you want to add. Make sure you delete the portion between the parenthesis. Leave the parenthesis and paste in your url. Now do the same where it says-http://yourimageurl.jpg
with the link from photobucket. You have the choice to add in a title of your post. I opted out as it messed up the clean look I was going for, and most of my pictures had the title already on them. If you want to add in the title simply replace example with your title. If not erase it.
6. Adjust image size
If you want your pictures 3 across then you will want to change the 25% to 33%. Then change the page setting to Compose. All your pictures will be huge. Click on them and change them by clicking the small button. They will all look uniform now. Continue to add in the html code and go back through all the steps as you need to add in new posts to your gallery.

All of this can be quite time consuming so I try to add in my photos and pictures a few at a time as I publish them. Once you get the hang of it it will be easier and easier.
I hope this was helpful to you and gave you the tools you need if you have been also dreaming of beautiful gallery page for all your posts!
Let me know if you have any questions or if anything needs to be made clearer!
There are still so many things I want to change about my blog to make it better but for now I'll keep taking one step at a time to get it to where I want it to be. Even though the process can at times be frustrating, it's so rewarding to look back and see how far you have come!
Linking up here!


Thanks for the tutorial, Rebekah. Please bear with me if this is an overly-basic question, but where would you use a gallery page of images? Would you embed it into a post itself to show a fun sampling of pictures, or is it for another purpose that I'm missing?
ReplyDeleteAlso, is this different than creating a photo collage on PicMonkey? Thanks!
Hey Robin! That's okay I am pretty clueless too;) If you look at the top of my blog it says, Homeschool, faith, homemaking.... those are my pages. So when you click on them it takes you to the image gallery;)
DeleteGreat, thorough tutorial.
ReplyDeleteLooks fabulous too. I forget you're on Blogger until I see the comment box. You've done a wonderful job customizing your site!
Wishing you a lovely evening.
xoxo
Thanks Jennifer! I appreciate it!
DeleteThis is great! So need this, thank you!
ReplyDeleteOh good! SO glad you found it helpful! Did you switch back to blogger?
DeleteThank you! Saved for Future Reference!
ReplyDeleteYour blog looks very nice! And - it's such a blessing for me to read that you are prioritizing your family before the blog. Every blogger would love to be popular with a lots of followers (me included) and fancy photos with graphics, but it all takes time - especially when you are just teaching yourself how to do it. Way to go, Mama! :-)
ReplyDeleteAnd thanks for this tutorial too.
Carol
puretsimple.blogspot.com
Thanks so much for sharing!
ReplyDeleteThat's a great idea!
Thank you! Your blog is very nice. I am working on mine, I have had it for 8 years or more, but quit blogging for a long time. Now I am trying to clean it up. I feel a little overwhelmed when I look at other blogs. lol But, I really just like the blog for me as a journal and sharing my heart too. But I would like for it to look better.
ReplyDeleteThis comment has been removed by a blog administrator.
ReplyDelete